
Welcome to the wonderful world of anomaly detection using deep learning! In this guide, we’ll walk you through the implementation of Deep Support Vector Data Description (Deep SVDD) using PyTorch, as introduced in the ICML 2018 paper “Deep One-Class Classification.” Get ready to unravel the potential of this innovative method!
Understanding Deep SVDD through Analogy
Think of Deep SVDD like a vigilant guard at a museum. This guard has been trained to recognize the original artwork (normal class) but needs to identify counterfeit paintings (anomalies) as they enter the gallery. Here’s how it works:
- The guard (Deep SVDD model) learns the features of the original artwork (normal data) during training.
- As new paintings (data samples) come in, the guard assesses each one based on its training.
- If a painting deviates too much from the learned features, it is flagged as counterfeit (anomaly).
This way, Deep SVDD provides a robust mechanism for detecting anomalies by precisely tailoring its training to distinguish normal from abnormal instances.
Installation Guide
To get started, you need to install the necessary libraries to run the code. Here’s how:
- Ensure you have Python 3.7 installed on your machine.
- Clone the repository to your directory of choice:
git clone https://github.com/lukasruff/Deep-SVDD-PyTorch.gitUsing Virtualenv
pip install virtualenv
cd path-to-Deep-SVDD-PyTorch-directory
virtualenv myenv
source myenv/bin/activate
pip install -r requirements.txt
Using Conda
cd path-to-Deep-SVDD-PyTorch-directory
conda create --name myenv
source activate myenv
while read requirement; do conda install -n myenv --yes $requirement; done < requirements.txt
Running Experiments
With everything set up, let's run some experiments using the MNIST and CIFAR-10 datasets.
Running MNIST Example
Follow these steps:
cd path-to-Deep-SVDD-PyTorch-directory
# activate virtual environment
source myenv/bin/activate  # or source activate myenv for conda
# create folder for experimental output
mkdir log_mnist_test
# change to source directory
cd src
# run experiment
python main.py mnist mnist_LeNet ..log_mnist_test ..data --objective one-class --lr 0.0001 --n_epochs 150 --lr_milestone 50 --batch_size 200 --weight_decay 0.5e-6 --pretrain True --ae_lr 0.0001 --ae_n_epochs 150 --ae_lr_milestone 50 --ae_batch_size 200 --ae_weight_decay 0.5e-3 --normal_class 3
This will train a one-class Deep SVDD model where digit 3 is considered the normal class.
Running CIFAR-10 Example
Use the following commands:
cd path-to-Deep-SVDD-PyTorch-directory
# activate virtual environment
source myenv/bin/activate  # or source activate myenv for conda
# create folder for experimental output
mkdir log_cifar10_test
# change to source directory
cd src
# run experiment
python main.py cifar10 cifar10_LeNet ..log_cifar10_test ..data --objective one-class --lr 0.0001 --n_epochs 150 --lr_milestone 50 --batch_size 200 --weight_decay 0.5e-6 --pretrain True --ae_lr 0.0001 --ae_n_epochs 350 --ae_lr_milestone 250 --ae_batch_size 200 --ae_weight_decay 0.5e-6 --normal_class 3
Here, it trains a one-class Deep SVDD model where cats are considered the normal class.
Visualizing Results
Once run, you can visualize the results for both datasets:
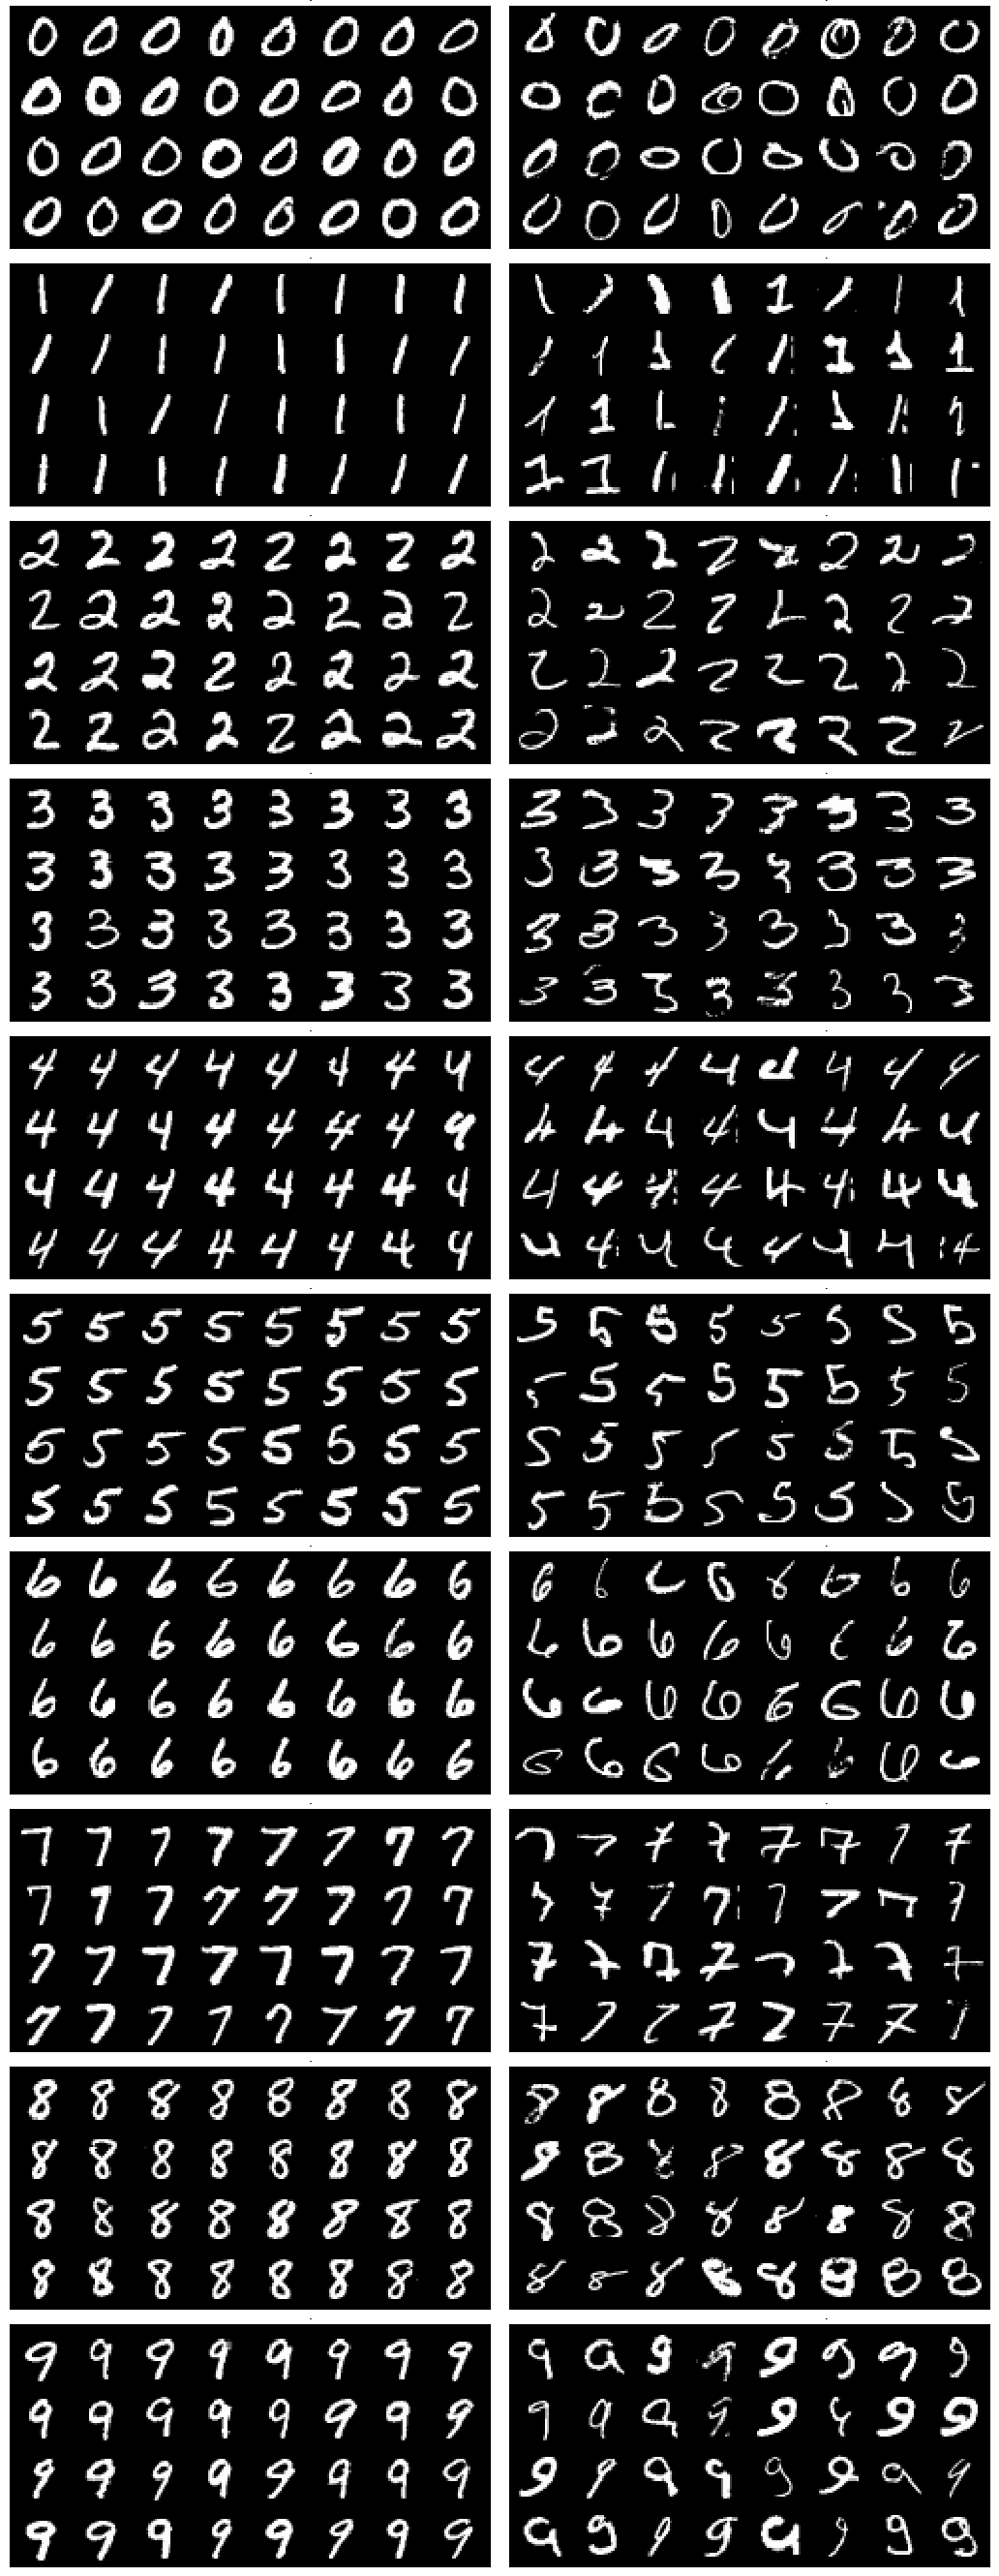
For MNIST, you'll see examples of normal and anomalous test cases:
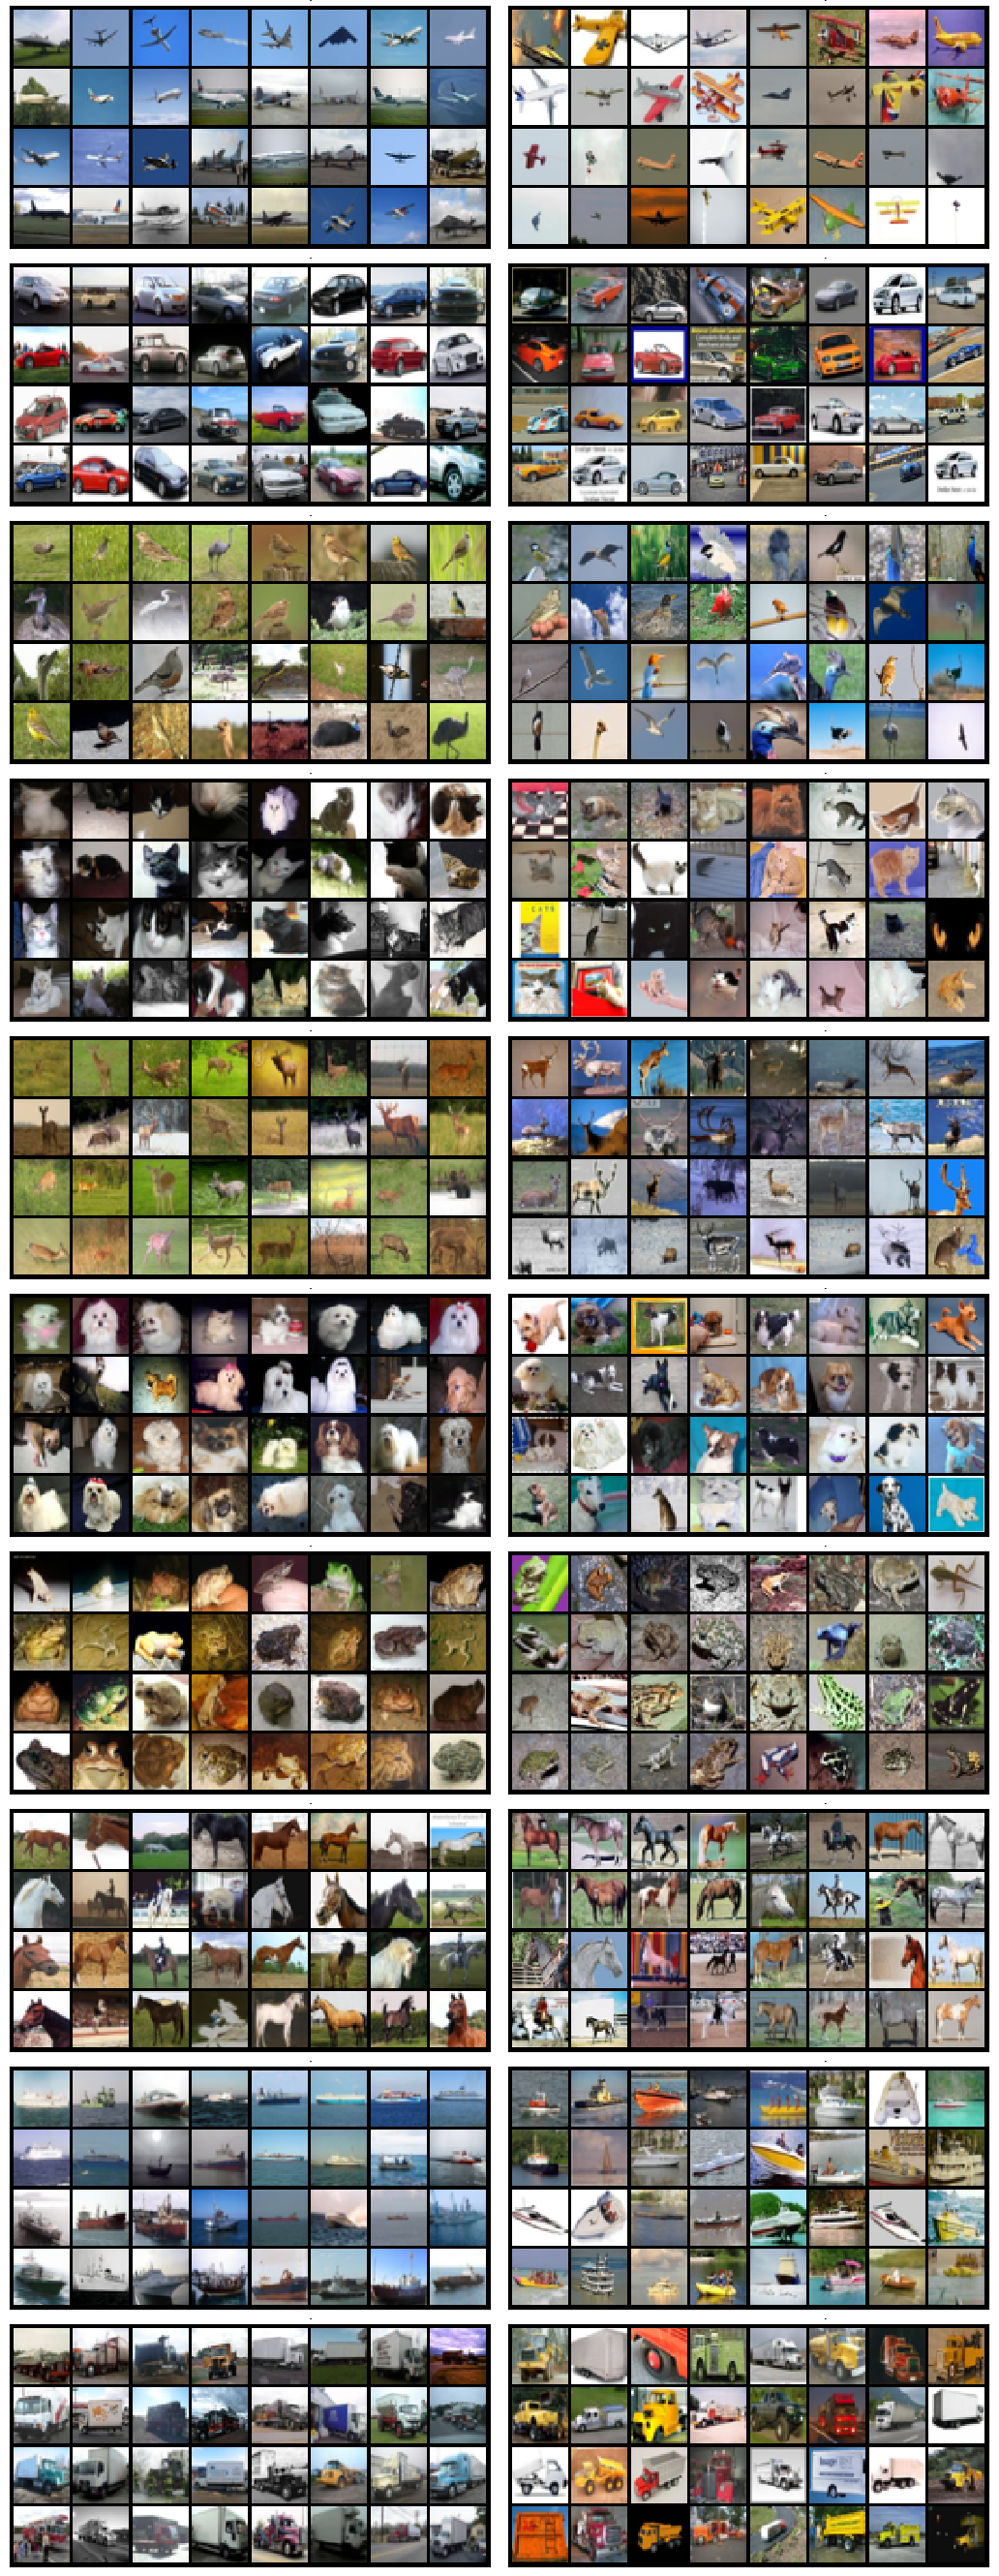
For CIFAR-10, similarly, check the results:
Troubleshooting
If you encounter any issues while setting up or running the code, here are some troubleshooting tips:
- Package Installation Errors: Ensure that all required packages are correctly listed in the
requirements.txtand that your virtual environment is activated. - Environment Conflicts: Sometimes different libraries can conflict. Consider setting up a new, clean environment to avoid any clashes.
- Running on Different Datasets: If you're attempting to run on datasets other than MNIST or CIFAR-10, make sure that the dataset is organized as expected by the script.
For more insights, updates, or to collaborate on AI development projects, stay connected with fxis.ai.
Conclusion
With this installation and running guide, you're well on your way to implementing Deep SVDD using PyTorch. This approach opens new avenues for anomaly detection that can be tailored for various datasets.
At fxis.ai, we believe that such advancements are crucial for the future of AI, as they enable more comprehensive and effective solutions. Our team is continually exploring new methodologies to push the envelope in artificial intelligence, ensuring that our clients benefit from the latest technological innovations.